2020. 6. 10. 06:30ㆍOracle Cloud
Contents
* 해당 내용은 오라클 제품을 다루고 있지만 이는 개인적인 테스트 결과이며, 오라클 공식 문서는 아님을 미리 밝힙니다.
이제 Wordpress는 설치가 완료되었습니다.
지금부터는 워드프레스를 사용하다보면 결국 수정하게 되는 부분들을 수정해 보려고 합니다.
꼭 해야하는 것은 아니지만 운영하다보면 결국 설정하게 되는 부분들입니다.
A. wordpress 설정파일 수정
B. php.ini 및 nginx.conf 설정파일 수정
c. wordpress 권장 개선사항 해결하기
로 나누어 설명해 드리겠습니다.
우선 wordpress 설정에서 추가하여 나중에 해결할 부분을 해결하겠습니다.
15-1-1. wp-config.php에 임시디렉토리 설정하기
여기서는 Editplus를 사용하겠습니다.
Editplus로 서버에 접속하여 /var/www/html/에 가서 wp-config.php 파일을 엽니다.

해당 화면 맨 아래 항목 바로 위에 define('WP_TEMP_DIR', dirname(__FILE__) . '/wp-content/temp'); 라고 입력합니다. 이왕이면 주석과 함께 입력하면 좋습니다. /* wordpress theme & plugin download temp folder */
/* wordpress theme & plugin download temp folder */
define('WP_TEMP_DIR', dirname(__FILE__) . '/wp-content/temp');
15-1-2. FTP 연결 정보 입력
그리고 그 아래 FTP 연결정보를 FTP 서버를 받는 것이 아닌 direct로 연결하도록 설정합니다.
define('FS_METHOD', 'direct'); 라고 입력하면 됩니다. 주석은 /* FTP Direct access */ 라고 하면 될까요?
/* FTP Direct access */
define('FS_METHOD', 'direct');
그럼 소스 맨 아래 이렇게 변경 하셨을 겁니다.

이번에는워드프레스 파일 upload 크기나 메모리 관리 및 버퍼용량 등 서버를 운영하며 필요한 정보들을 수정하여 보겠습니다.
이번에는 PuTTY로 접속하겠습니다.
15-2-1. php.ini 수정
PuTTY로 접속하신 후 명령창에 sudo nano /etc/php/7.4/fpm/php.ini 를 입력합니다.
ubuntu@wordpress:~$ sudo nano /etc/php/7.4/fpm/php.ini그런 후 CTRL + W키를 눌러 아래 내용을 검색합니다. (해당 내용이 388, 409, 697, 846 줄에 있어 검색하셔야 찾을 수 있습니다.;;;)
upload_max_filesize = 2M
post_max_size = 8M
memory_limit = 128M
max_execution_time = 30
* 해당 내용을 드래그 하신 후 PuTTY에서 마우스 오른쪽을 누르시면 붙습니다.
그리고 해당 내용을 아래의 내용으로 수정합니다.
upload_max_filesize = 256M
post_max_size = 256M
memory_limit = 256M
max_execution_time = 1000
15-2-2. 이번에는 cli에 있는 php.ini를 수정합니다.
명령창에 sudo nano /etc/php/7.4/cli/php.ini 를 입력합니다.
ubuntu@wordpress:~$ sudo nano /etc/php/7.4/cli/php.ini그런 후 수정 내용도 거의 유사합니다.
upload_max_filesize = 256M
post_max_size = 256M
max_execution_time = 1000
* 여기서 memory_limit = -1로 되어 있는데 이 부분은 수정 안하셔도 됩니다.
15-2-3. nginx.conf도 수정하겠습니다.
Nginx에서 client_max_body_size를 설정하여 줍니다. 추가하고 그 외에 fastcgi buffer를 설정하여 Bad Gateway가 발생하는 것을 줄여주도록 합니다.
명령창에 sudo nano /etc/nginx/nginx.conf 를 입력합니다.
ubuntu@wordpress:~$ sudo nano /etc/nginx/nginx.conf그런 후 niginx.conf 파일에 아래의 내용을 추가해 줍니다.
client_max_body_size 64m;
fastcgi_buffers 8 16k;
fastcgi_buffer_size 32k;
fastcgi_connect_timeout 300;
fastcgi_send_timeout 300;
fastcgi_read_timeout 300;
해당 내용의 위치는 types_hash_max_size 2048; 아래 넣어주시면 됩니다.
user www-data;
worker_processes auto;
pid /run/nginx.pid;
include /etc/nginx/modules-enabled/*.conf;

events {
        worker_connections 768;
        # multi_accept on;
}

http {

        ##
        # Basic Settings
        ##

        sendfile on;
        tcp_nopush on;
        tcp_nodelay on;
        keepalive_timeout 65;
        types_hash_max_size 2048;

        client_max_body_size 64m;
        fastcgi_buffers 8 16k;
        fastcgi_buffer_size 32k;
        fastcgi_connect_timeout 300;
        fastcgi_send_timeout 300;
        fastcgi_read_timeout 300;
        # server_tokens off;

        # server_names_hash_bucket_size 64;
        # server_name_in_redirect off;
15-2-4. 이제 설정이 완료되었으니 php 및 nginx를 재가동하겠습니다.
명령창에
sudo service php7.4-fpm restart
sudo nginx -t
sudo service nginx restart
를 입력합니다.
ubuntu@wordpress:~$ sudo service php7.4-fpm restart
ubuntu@wordpress:~$ sudo nginx -t
nginx: the configuration file /etc/nginx/nginx.conf syntax is ok
nginx: configuration file /etc/nginx/nginx.conf test is successful
ubuntu@wordpress:~$ sudo service nginx restart
이제 마지막으로 워드프레스에 들어가 사이트 상태에 나온 개선사항을 보안해 보겠습니다.

맨 아래 필수 모듈이 누락되어있다고 나타납니다. ㅠ_ㅜ
7. Nginx 서버에 PHP7 설치하기에서 php 설치할때 빼먹은 듯 합니다. 이 부분은 수정하여 이거 굳이 할 필요없도록 수정해 놓아야 겠네요.
15-3-1. 워드프레스 필수모듈 (imagick, bcmath) 을 설치합니다.
명령창에 sudo apt install php7.4-gd php7.4-imagick php7.4-xml php7.4-zip php7.4-bcmath -y 를 입력합니다.
* 초기 작성 시 php7.4-xml php7.4-zip 이 없었으나 워드프레스 업그레이드 후 추가하라고 나와서 해당 부분을 추가 합니다.
php7.4-imagick 을 설치하다가 이어서 설치하겠냐고 묻습니다. 이때 y를 눌러줍니다.
After this operation, 2731 kB of additional disk space will be used.
Do you want to continue? [Y/n] y
ubuntu@wordpress:~$ sudo apt install php7.4-gd php7.4-imagick php7.4-xml php7.4-zip php7.4-bcmath -y
Reading package lists... Done
Building dependency tree
Reading state information... Done
Note, selecting 'php-imagick' instead of 'php7.4-imagick'
The following package was automatically installed and is no longer required:
  grub-pc-bin
Use 'sudo apt autoremove' to remove it.
The following additional packages will be installed:
  ttf-dejavu-core
The following NEW packages will be installed:
  php-imagick ttf-dejavu-core
0 upgraded, 2 newly installed, 0 to remove and 10 not upgraded.
Need to get 287 kB of archives.
After this operation, 2731 kB of additional disk space will be used.
Do you want to continue? [Y/n] y
그 다음 명령창에서 sudo apt update 를 입력해줍니다.
ubuntu@wordpress:~$ sudo apt update
Hit:1 http://ap-seoul-1-ad-1.clouds.archive.ubuntu.com/ubuntu bionic InRelease
Get:2 http://security.ubuntu.com/ubuntu bionic-security InRelease [88.7 kB]
Hit:3 http://ppa.launchpad.net/ondrej/php/ubuntu bionic InRelease
Get:4 http://ap-seoul-1-ad-1.clouds.archive.ubuntu.com/ubuntu bionic-updates InRelease [88.7 kB]
Get:5 http://ap-seoul-1-ad-1.clouds.archive.ubuntu.com/ubuntu bionic-backports InRelease [74.6 kB]
Get:6 http://ap-seoul-1-ad-1.clouds.archive.ubuntu.com/ubuntu bionic-updates/main amd64 Packages [951 kB]
Fetched 1203 kB in 6s (201 kB/s)
Reading package lists... Done
Building dependency tree
Reading state information... Done
10 packages can be upgraded. Run 'apt list --upgradable' to see them.
이제 워드프레스 관리자 페이지에 접속하여 도구 > 사이트 건강상태를 체크하면 해당 부분이 해결되었습니다.

15-3-2. 비활성화 테마 모두 제거하기
관리자 페이지 > 테마 디자인 > 테마에 접속합니다.
맨 왼쪽에 활성이라고 표시되어 있는 것을 확인할 수 있습니다.
이제 삭제해야 하는 Twenty Seventeen을 선택합니다.

선택하면 하단 가운데에 활성화 | 실시간 미리보기 있고 오른쪽 끝에 삭제라는 TEXT가 있습니다. 삭제를 선택하면 확인창이 나타는데 이때 확인을 누릅니다.
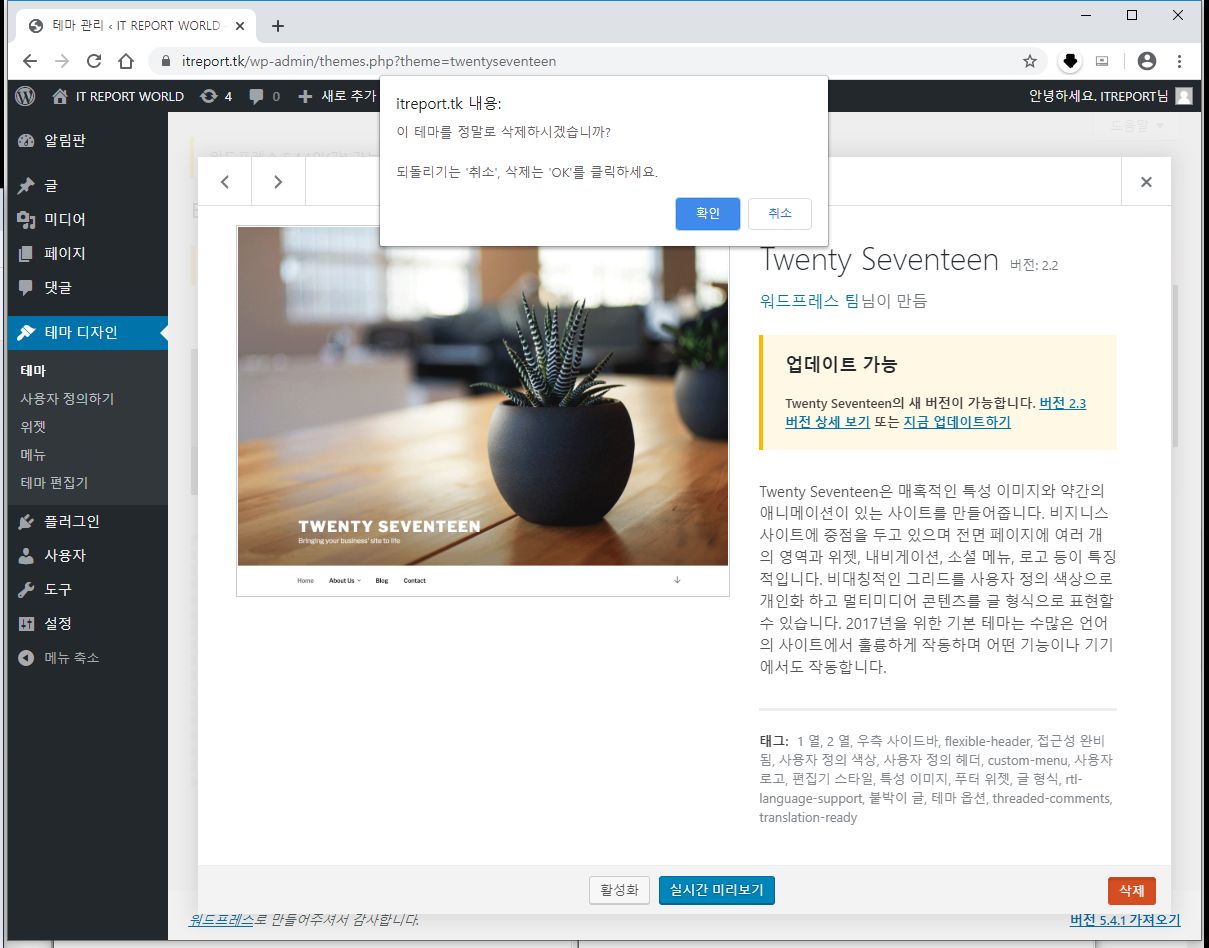
마찮가지로 Twenty Sixteen 테마도 선택 하여 삭제 합니다.
15-3-3. 비활성화 플러그인 모두 제거하기
이번에는 관리자 페이지 > 플러그인 > 설치된 플러그인 을 선택합니다.
해당 플러그인들은 활성화를 추천합니다만 '아키스밋 스팸 방지' 는 유료 플러그인입니다.
삭제 버튼을 누르면 해당 플러그인이 삭제됩니다.
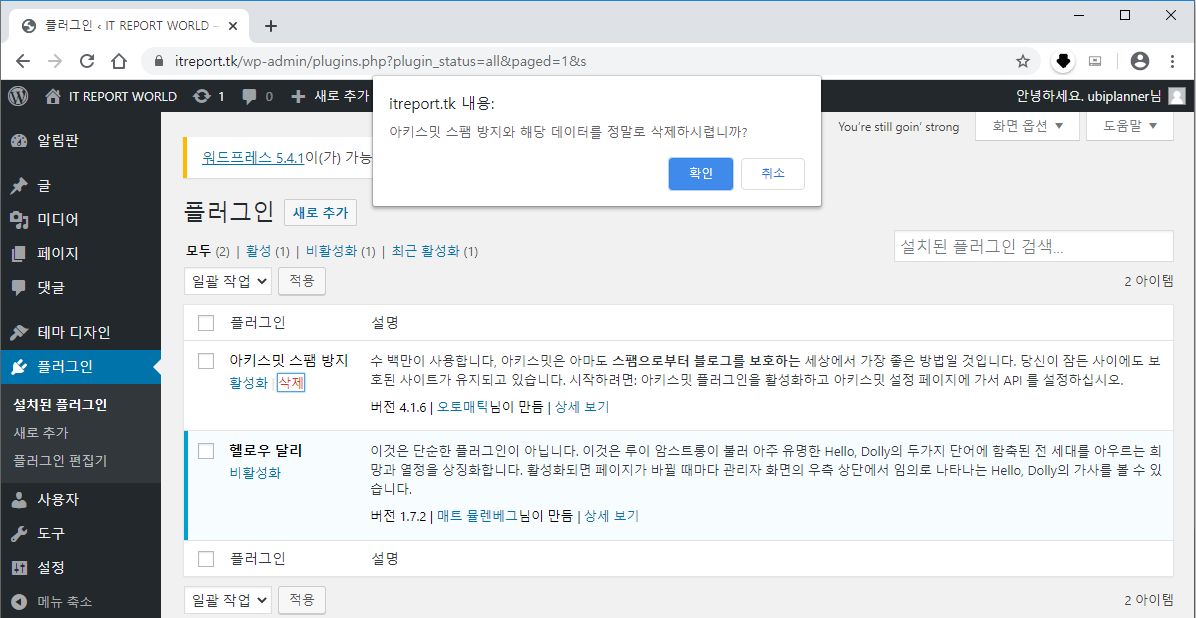
이제 마지막으로 워드프레스 업데이트입니다.
초기 설치시에는 그리 문제는 없는데 업데이트 전에는 항상 DB를 백업하는 것을 추천합니다.

15-3-4. 워드프레스 DB 백업하기
워드프레스 DB를 손쉽게 백업하는 방법은 phpMyAdmin에서 수정하는 것입니다.
우선 phpMyAdmin에 접속하신 하신 후 왼쪽 DB 트리 중 워드프레스 DB를 선택합니다. (여기서는 itreport_wordpress)
선택하고 난 후 내버내기 버튼을 선택합니다.

DB에서 테이블이 추출되었으면 내버내기 방법을 : 퀵-필요최소한의 옵션만을 표시함 으로 선택하여 아래 실행 버튼을 누릅니다.
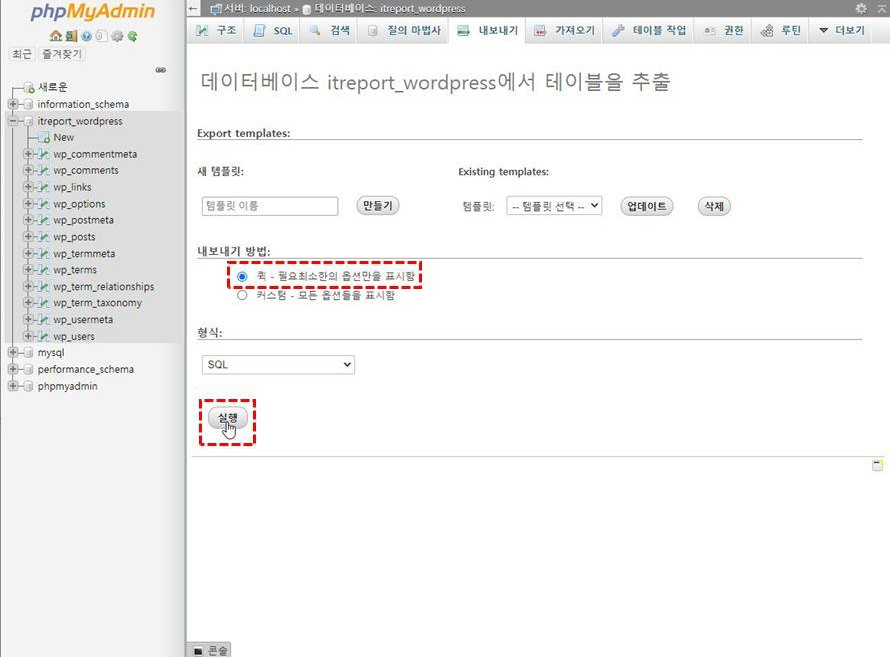
그러면 DB파일이 다운로드 됩니다.

15-3-5. 워드프레스 업데이트
워드프레스 업데이트는 관리자페이지 > 알림판 하단 업데이트를 누릅니다.
그곳에서 최신 버전의 업데이트를 하면 됩니다. 지금 업데이트 버튼을 누릅니다.
- 상당 시간이 걸립니 갑자기 창을 듣지 않는 것을 추천합니다.
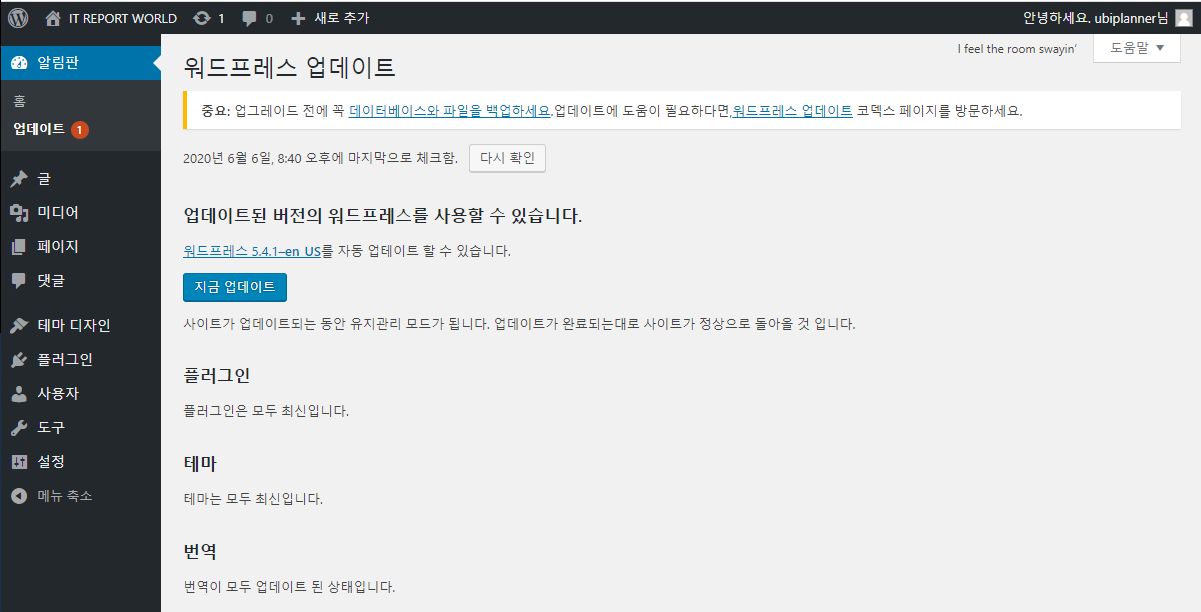
업데이트가 완성되면 워드프레스 해당 버전의 설명이 나타납니다.
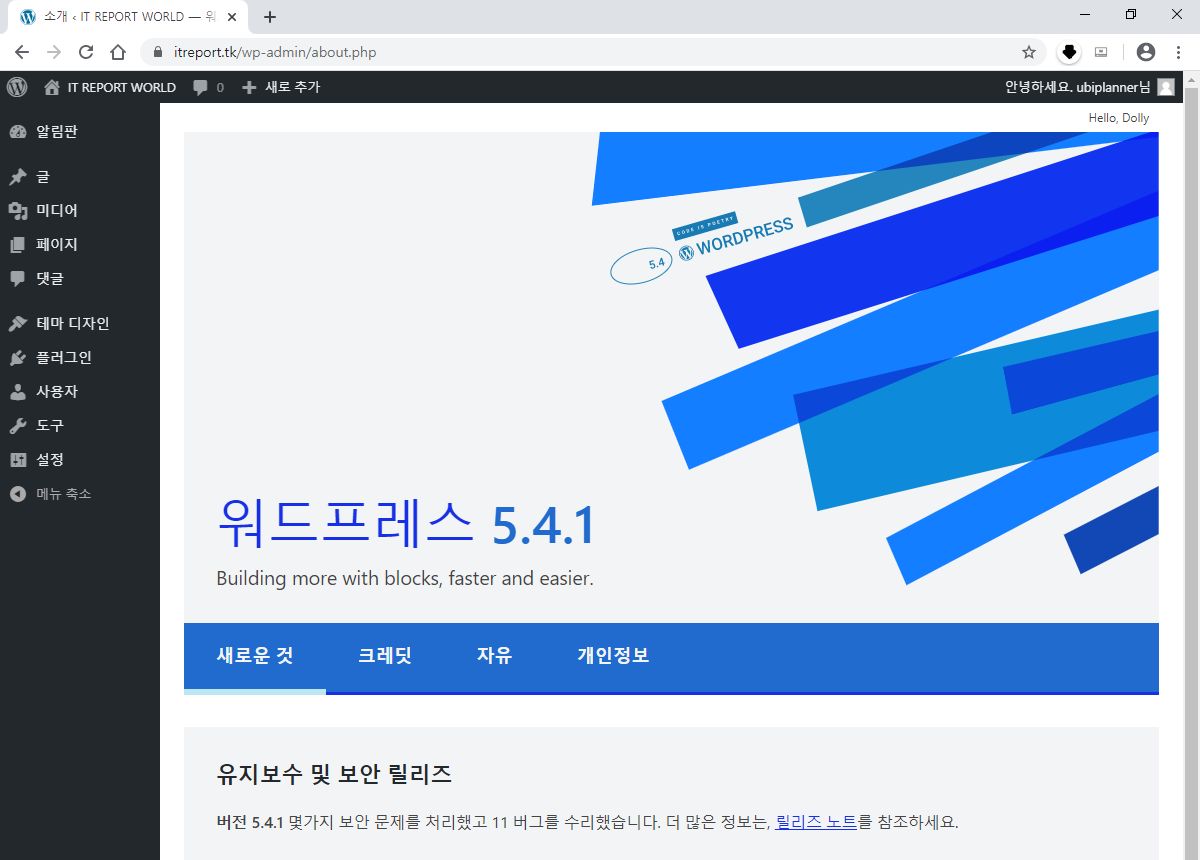
* 저는 해당 버전으로 업데이트를 하고 나니 아래와 같인 모듈이 설치 되어 있지 않다고 나왔습니다.

이럴때는 PuTTY 명령창에 sudo apt-get install php7.4-xml php7.4-zip 를 입력하시고 sudo update를 입력하시면 해결됩니다.
ubuntu@wordpress:~$ sudo apt-get install php7.4-xml php7.4-zip
Reading package lists... Done
Building dependency tree
Reading state information... Done
The following package was automatically installed and is no longer required:
  grub-pc-bin
Use 'sudo apt autoremove' to remove it.
The following additional packages will be installed:
  libzip4
The following NEW packages will be installed:
  libzip4 php7.4-xml php7.4-zip
0 upgraded, 3 newly installed, 0 to remove and 10 not upgraded.
Need to get 169 kB of archives.
After this operation, 632 kB of additional disk space will be used.
Do you want to continue? [Y/n] y
Get:1 http://ppa.launchpad.net/ondrej/php/ubuntu bionic/main amd64 libzip4 amd64 1.6.1-3+ubuntu18.04.1+deb.sury.org+2 [52.0 kB]
Get:2 http://ppa.launchpad.net/ondrej/php/ubuntu bionic/main amd64 php7.4-xml amd64 7.4.6-1+ubuntu18.04.1+deb.sury.org+1 [95.8 kB]
Get:3 http://ppa.launchpad.net/ondrej/php/ubuntu bionic/main amd64 php7.4-zip amd64 7.4.6-1+ubuntu18.04.1+deb.sury.org+1 [20.9 kB]
Fetched 169 kB in 3s (51.3 kB/s)
Selecting previously unselected package libzip4:amd64.
(Reading database ... 109452 files and directories currently installed.)
Preparing to unpack .../libzip4_1.6.1-3+ubuntu18.04.1+deb.sury.org+2_amd64.deb ...
Unpacking libzip4:amd64 (1.6.1-3+ubuntu18.04.1+deb.sury.org+2) ...
Selecting previously unselected package php7.4-xml.
Preparing to unpack .../php7.4-xml_7.4.6-1+ubuntu18.04.1+deb.sury.org+1_amd64.deb ...
Unpacking php7.4-xml (7.4.6-1+ubuntu18.04.1+deb.sury.org+1) ...
Selecting previously unselected package php7.4-zip.
Preparing to unpack .../php7.4-zip_7.4.6-1+ubuntu18.04.1+deb.sury.org+1_amd64.deb ...
Unpacking php7.4-zip (7.4.6-1+ubuntu18.04.1+deb.sury.org+1) ...
Setting up libzip4:amd64 (1.6.1-3+ubuntu18.04.1+deb.sury.org+2) ...
Setting up php7.4-xml (7.4.6-1+ubuntu18.04.1+deb.sury.org+1) ...

Creating config file /etc/php/7.4/mods-available/dom.ini with new version

Creating config file /etc/php/7.4/mods-available/simplexml.ini with new version

Creating config file /etc/php/7.4/mods-available/xml.ini with new version

Creating config file /etc/php/7.4/mods-available/xmlreader.ini with new version

Creating config file /etc/php/7.4/mods-available/xmlwriter.ini with new version

Creating config file /etc/php/7.4/mods-available/xsl.ini with new version
Setting up php7.4-zip (7.4.6-1+ubuntu18.04.1+deb.sury.org+1) ...

Creating config file /etc/php/7.4/mods-available/zip.ini with new version
Processing triggers for libc-bin (2.27-3ubuntu1) ...
Processing triggers for php7.4-fpm (7.4.6-1+ubuntu18.04.1+deb.sury.org+1) ...
Processing triggers for php7.4-cli (7.4.6-1+ubuntu18.04.1+deb.sury.org+1) ...
ubuntu@wordpress:~$ sudo apt update
Get:1 http://security.ubuntu.com/ubuntu bionic-security InRelease [88.7 kB]
Hit:2 http://ap-seoul-1-ad-1.clouds.archive.ubuntu.com/ubuntu bionic InRelease
Hit:3 http://ppa.launchpad.net/ondrej/php/ubuntu bionic InRelease
Get:4 http://ap-seoul-1-ad-1.clouds.archive.ubuntu.com/ubuntu bionic-updates InRelease [88.7 kB]
Get:5 http://ap-seoul-1-ad-1.clouds.archive.ubuntu.com/ubuntu bionic-backports InRelease [74.6 kB]
Fetched 252 kB in 2s (104 kB/s)
Reading package lists... Done
Building dependency tree
Reading state information... Done
10 packages can be upgraded. Run 'apt list --upgradable' to see them.
15-3-6. 워드프레스 정상 동작
워드프레스가 설치되고 모두 정상 동작을 하면 아래와 같이 나타납니다.

지금까지 함께해 주셔서 감사합니다.
내일은 오라클 클라우드 부트 볼륨 백업에 대해서 알아보겠습니다.
부트 볼륨 백업은 서버 부팅 환경을 그대로 백업하는 방식입니다.
이를 통하여 여러대의 동일한 서버를 생성 할 수도 있습니다.
단, 예약된 공용 IP (고정IP)정보는 복사가 안되고 신규 IP로 지정 받습니다.
이야기 드리고 싶은 것은 이제 시스템을 다 설치하셨다고 생각되면 백업을 손쉽게 받고 나중에 이를 복구하는 방법을 알아보고자 합니다.
Contents
* 해당 내용은 오라클 제품을 다루고 있지만 이는 개인적인 테스트 결과이며, 오라클 공식 문서는 아님을 미리 밝힙니다.
'Oracle Cloud' 카테고리의 다른 글
| 오라클 클라우드 BOOT VOLUME - 2. 부트 볼륨 백업하기 (7) | 2020.06.12 |
|---|---|
| 오라클 클라우드 BOOT VOLUME - 1. 부트 볼륨 백업하기 (6) | 2020.06.11 |
| 14. 오라클 클라우드에서 우분투 LEMP - Wordpress 설치하기 (1) | 2020.06.09 |
| 13. 오라클 클라우드에서 우분투 LEMP - DB 생성하기 (3) | 2020.06.08 |
| 오라클 클라우드 - Cloud Shell을 이용하여 PuTTY 없이 접속하기 (4) | 2020.06.07 |